We recently encountered a new issue following Microsoft’s large-scale deployment of the Windows UEFI CA 2023 Secure Boot certificates. Several users who returned from vacation found that their laptops failed to boot and displayed the following error during startup:
Security Boot Violation
Invalid signature detected. Check Secure Boot Policy in Setup.
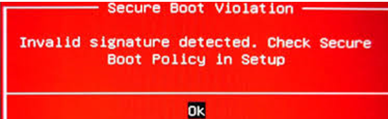
In our environment, the issue occurred on devices on which the Windows UEFI CA 2023 certificates had already been deployed, and the Windows bootloader had been updated to a version signed with these new certificates. Refer to the post that explains how to check and update Secure Boot UEFI certificates in Windows. If the Windows UEFI CA 2023 certificate is missing from the Secure Boot signature database (db) stored in UEFI NVRAM, the firmware cannot validate the digital signature of the updated Windows bootloader (bootmgfw.efi). As a result, the computer will fail to boot with the Secure Boot error Invalid Signature Detected.
This issue can occur for several reasons, including:
- The Secure Boot certificates were manually deleted from the UEFI firmware configuration.
- The UEFI firmware has been updated, replaced, or reset to its factory settings.
- The contents of the UEFI NVRAM, including the Secure Boot databases, were cleared after a CMOS battery failure or replacement. This was the root cause in our environment, affecting several Razer Blade laptops.
Symptoms
If Secure Boot mode is enabled in the UEFI settings, the system fails to boot the Windows Boot Manager and displays an error that looks like this:
Invalid Signature Detected. Check Secure Boot Policy in Setup.

The exact error message displayed and its text may vary depending on the computer manufacturer and UEFI firmware implementation.
If Secure Boot is disabled in the UEFI settings, Windows can usually boot normally because the bootloader signature check is skipped. However, this reduces boot-chain security, so it is best treated as a temporary workaround.
Windows UEFI CA 2023 Certificates and the Updated Windows Bootloader
Beginning with cumulative Windows updates released between January and June 2026, Microsoft automatically deployed the new Windows UEFI CA 2023 certificates to all supported devices. These certificates have been added to the Secure Boot signature database (DB), which is stored in the non-volatile memory (NVRAM) of the UEFI firmware located in the motherboard’s SPI flash.
As part of the same update, Windows also replaced the Windows Boot Manager file (bootmgfw.efi) with a new version digitally signed with the Windows UEFI CA 2023 certificate.
When Secure Boot is enabled, the UEFI firmware verifies the digital signature of the Windows bootloader before transferring control to it. If the bootloader is signed with a certificate present in the Secure Boot database stored in the UEFI NVRAM, the firmware considers it to be trusted and allows the Windows bootloader to start.
However, problems occur if the Windows bootloader has been updated to the new, Windows UEFI CA 2023-signed version while the corresponding certificate is missing from the firmware Secure Boot database. This can happen if the UEFI firmware was updated or reset, the Secure Boot databases were cleared manually, or the UEFI NVRAM contents were cleared in some other way.
In this situation, the UEFI firmware cannot validate the signature of the updated bootmgfw.efi file. Consequently, Secure Boot treats the bootloader file as untrusted and prevents Windows from booting with the error:
Secure Boot Violation: Invalid Signature Detected
Ways to fix the UEFI signature validation error:
- Disable Secure Boot in the UEFI firmware. While this allows Windows to boot, it is generally not recommended as it reduces the security of the boot process and removes protection against unauthorized bootloaders.
- Update the UEFI firmware to a version provided by your hardware manufacturer that includes support for the Windows UEFI CA 2023 certificates. This is the preferred long-term solution, but it can be time-consuming and carries some risk if the firmware update is interrupted or performed incorrectly.
- Use Microsoft’s Secure Boot Recovery tool to offline-import the Windows UEFI CA 2023 certificates into the UEFI Secure Boot database (NVRAM). This is the simplest and safest approach, which we will cover in more detail below.
Add Windows UEFI CA 2023 Certificates to UEFI NVRAM Using SecureBootRecovery.efi
To resolve this issue, you need to add the new Windows UEFI CA 2023 certificates to the Secure Boot signature database (db) stored in the computer’s UEFI firmware. Microsoft has added the Microsoft Secure Boot Recovery tool (SecureBootRecovery.efi) to all modern Windows versions. This tool allows administrators to import the new Windows UEFI CA 2023 certificates into the Secure Boot database in the UEFI NVRAM. The SecureBootRecovery.efi executable can be copied from any Windows 11 machine that has had the latest cumulative security updates installed (released after April 2026).
Our goal is to create a bootable USB flash drive that contains the SecureBootRecovery.efi file to reinstall the new certificates into the device’s NVRAM. In this example, I will show you how to copy the file manually to a clean USB drive directly from the affected computer. If you have another working Windows device available, you can create the USB recovery media on that computer instead.
- Temporarily disable Secure Boot in the UEFI firmware settings and then boot Windows normally. In this mode, the UEFI firmware doesn’t validate the digital signatures of the boot files.
- Verify that the new Windows UEFI CA 2023 certificate is missing from the allowed signature database stored in your motherboard’s UEFI firmware. Open an elevated PowerShell console and run the following command. It should return False:
[System.Text.Encoding]::ASCII.GetString((Get-SecureBootUEFI -Name db).Bytes) -match "Windows UEFI CA 2023"
- Check which certificate was used to sign the Windows bootloader (bootmgfw.efi) on the hidden EFI partition:
Get-PfxCertificate -FilePath "e:\EFI\microsoft\boot\bootmgfw.efi" | Format-List Subject, IssuerThe CN field shows that the boot loader has been signed using the new Windows UEFI CA 2023 certificate.
- Connect the USB flash drive to a computer, clear it, create one partition, and format it in the FAT32 file system. I will use the
diskpartcommand line tool to create a partition on the flash drive:
list disk– list the available disks
sel disk 2– Choose the number of the disk that corresponds to your USB flash drive
list part– list the partitions on a flash drive. In my case, there is only one partition.
Select it:sel part 1
format fs=fat32 quick– format the partition with FAT32
assign letter=G– assign the drive G letter to the volume
- You need to create a specific directory structure on the USB flash drive. Make a folder called EFI and a subfolder BOOT inside it:
mkdir g:\EFI\BOOT -Force - Copy the SecureBootRecovery.efi file from the C:\Windows\Boot\EFI\ folder to the new directory:
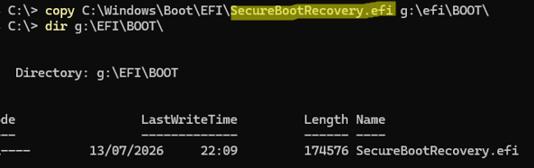
copy C:\Windows\Boot\EFI\SecureBootRecovery.efi g:\EFI\BOOT
You can copy the SecureBootRecovery.efi file from any computer running a supported Windows version. - Navigate to the directory and rename the SecureBootRecovery.efi file to bootx64.efi:
cd e:\EFI\BOOT
ren .\SecureBootRecovery.efi bootx64.efi
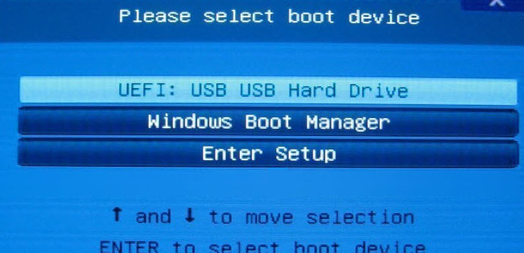
- Restart your computer and enable Secure Boot mode in the UEFI settings. Select your USB stick drive as the primary boot device and boot from it.

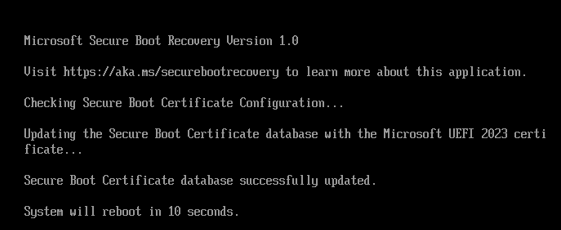
- UEFI will transfer control to the bootx64.efi file. This tool will check whether the new Windows UEFI CA 2023 certificates are present in the UEFI NVRAM certificate database. If the required certificates are missing, they will be imported into the firmware db automatically
Microsoft Secure Boot Recovery Version 1.0
Visit https://aka.ms/securebootrecovery to learn more about this application.
Checking Secure Boot Certificate Configuration...
Updating the Security Certificate database with the Microsoft UEFI 2023 certificate.
Secure Boot Certificate database successfully updated.
System will reboot in 10 seconds.
- After the process completes, restart the computer, remove the USB flash drive, and set Windows Boot Manager as the first boot device in the UEFI boot order. Check that Windows starts successfully with Secure Boot enabled.
- Confirm that the new Microsoft certificates have been successfully installed in the computer’s UEFI firmware:
[System.Text.Encoding]::ASCII.GetString((Get-SecureBootUEFI -Name db).Bytes) -match "Windows UEFI CA 2023"




Once the Windows UEFI CA 2023 certificates have been restored to the Secure Boot database, the UEFI firmware will trust the Windows bootloader that has been signed using the new certificate. As a result, Windows starts successfully with Secure Boot enabled.
The following message should appear in the Windows Security app (Settings -> Privacy & Security -> Windows Security -> Device Security):
Secure Boot is on and all required certificate updates have been applied. No further certificate changes are needed.
